
Starting Transplants Indoors
Starting plants from seed is generally the most inexpensive option for stocking your edible garden. On the other hand, some plants perform better when transplanted instead of directly sown. For many gardeners the happy medium is to start their own seed indoors. For those new to starting transplants indoors here a few tips we think will help.
Timing
Anytime we predict the weather we gamble. Starting transplants too early or too late can result in weak plants or late harvests.See our edibles infographics and the UF/IFAS Florida Vegetable Gardening Guide for planting dates specific to your regions of Florida.
Aim to start seeds indoors 4-8 weeks before the suggested outdoor planting dates. For larger plants, like watermelon, squash, and pumpkin, you might transplant in as little as four weeks. Similarly, if you are starting plants in small containers, four weeks may be all it takes for them to fill the cell.
You can also stagger your seedlings by starting them at two-week intervals. You may end up wasting seeds, but if you’re new to starting transplants this will give you some margin for error. You can add staggered transplants into your garden a few at a time, a method called succession planting (learn more from our article on the method).
If your seedlings outgrow their first containers before it’s time to plant, you can transplant them into larger containers. We don’t suggest going beyond 4″ pots however; transplants this size are difficult to care for indoors. And the longer your transplants remain indoors, the more likely they are to need additional fertilizer. Yellowing leaves and slow or stunted growth may be a sign of a nutrient deficiency. Contact your county Extension office with questions about fertilizing specific crops.
Light
While you can start seeds on a windowsill, there are a few reasons to install overhead lights instead. Space near windowsills is limited and won’t support dozens of transplants. Only south- or west-facing windows are bright enough to start strong seedlings, too. The light in windowsills is also directional, so seedlings will bend toward the light. You’ll need to rotate your seed trays 180 degrees every couple days to keep this bend from becoming permanent.
Seeds not receiving enough light will grow tall and leggy. If you’re starting more than a dozen seedlings, we suggest using an overhead light source. Florescent and LED lights are inexpensive, not too warm, and come in sizes that will fit just about anywhere in your home. They can also be put on timers to minimize the effort required on a daily basis.
Position your light source directly above the plants. The closer it is, the more light they’ll get, and the less “hardening off” they’ll require to transition to full sunlight. You can place the light source as close as a couple inches away from the tops of the plants, but you’ll need to move it up as they grow.
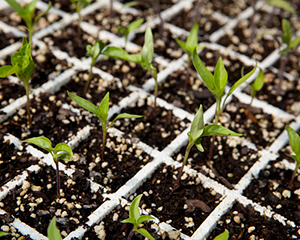
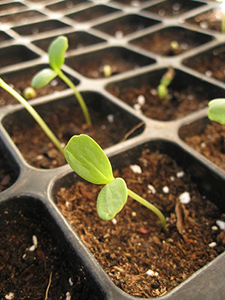
Containers
Transplants are generally started in small, shallow, plastic containers. The most common are plastic cell packs that sit in a shallow tray. You can use these containers a couple of seasons in a row, but only if you disinfect them between uses.
You can also use your own containers to start seeds, but there are a few things to consider. The containers should be shallow, not more than 2-3 inches deep. Deeper containers will be difficult to keep evenly moist without remaining soaked. Your container should also allow the plant to reach the appropriate transplant size without becoming root bound. Containers that keep each plant’s roots separate from each other will help you minimize root damage when it’s time to move them to the garden.
If you’re using cell packs, sow 2-3 seeds per cell and thin them out later. This does waste some seed, but it prevents wasted soil, space, and time. When it’s time to thin the seedlings, pull or cut the extras out of the cell leaving only the healthiest seedling. If you have empty cells, you can split the seedlings from one cell into two cells to fill the space. For plants that are difficult to transplant, we recommend cutting the extra seedlings off at soil-level instead of pulling them, in order to avoid disturbing the surviving seedling’s roots.
Soil
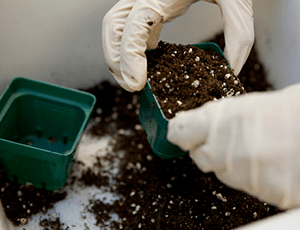
A light, fine-textured “seed-starting soil” mix is best for germinating seeds indoors. Seed-starting mixes tend to be expensive though, so most gardeners opt for regular “potting soil” instead. Avoid soil mixes labeled “garden soil,” “top soil,” and “raised bed soil.” These are usually too heavy for starting seeds and may hold too much moisture.
Whatever you do, don’t use the soil from your backyard. Composition aside, this soil is full of weed seeds. It may be weeks before you can tell which seedlings are weeds and which are vegetables.
Water
Watering correctly during the germination process may be the most important step to successful seed starting. You want the soil to remain evenly moist while the seedlings are young — never soggy and never completely dry. This moist environment is especially important until the plants reach a couple of inches in height. Commercially, growers mist regularly to achieve the perfect moisture level but this is impractical indoors. Instead, set a reminder to check the soil in the morning, every day. The plants won’t need water every day, but you won’t know if you don’t check.
Water early in the day, as needed, using a watering can with a gentle stream. You can also irrigate from beneath by adding water to a tray and allowing your transplants to soak it up from below. Bottom-watering is a little more work, but it is cleaner and keeps the moisture levels in each pot or cell more uniform.
Until your seedlings have a second set of leaves, you may want to cover the containers with clear plastic. This creates a mini greenhouse around the germinating seeds, keeping moisture in without blocking light. Some seed-starting kits come with clear plastic domes. For a DIY version, all you need is a clear sheet of plastic and some popsicle sticks. Place the sticks at the center and corners of the containers. Drape the plastic over these, covering the container without touching the soil.
Before transplanting, “harden” your seedlings off by allowing the soil to dry out a little between waterings. The soil should never become bone dry, but the top half-inch of soil should feel dry to the touch. You can read more about hardening off in the final section of this article.
Air circulation
In dicot plants (a groups of flowering plants that includes most of our vegetables), the first two seed leaves look fairly similar. We call these seed leaves cotyledons. The second set of leaves a dicot plant produces are true leaves, shaped more like those of an adult plant.
Once your seedlings have true leaves, air circulation becomes more important. Remove any clear plastic covers and install a small fan instead. Point the fan to blow gently across the seedlings. The airflow will discourage fungus and help seedlings develop a strong structure.
Heat
Some warm-season plants, like tomatoes, okra, peppers, and eggplant, germinate best in warm soil. If you experience low germination with a warm-season crop, a heat mat intended for horticultural use may help. These mats are placed below the seedling containers and heat the soil to the desired temperature.
While we like a good DIY as much as the next person, we don’t suggest repurposing other heat sources as seedling heating mats. Heating pads, Christmas lights, and other homemade solutions aren’t designed to be used in wet environments and often don’t provide an even heat. Using these items in ways other than their intended purpose could create a fire hazard.
Hardening-off and Transplanting
Seedlings started indoors are adapted to the gentle environment of your home. Transplanting them without letting them adapt to the outdoors is like dropping them off in the desert. Sunburn, dehydration, and even death by exposure — plants are vulnerable to these perils, too!

Harden your transplants off before you plant by exposing them to the elements a little at a time. Start with two hours of morning sun, then four, then six, and so on until they’ve spent a full day outdoors. Always water them at the beginning of this outdoor period. If they show signs of sunburn (brown patches on the leaves) or wilt dramatically, move them indoors and give them a day to recuperate.
Once you’re ready to transplant, follow the recommended spacing as you add them to your garden. If the plants still seem a bit tender, plant them on a cloudy day or late in the afternoon. Water daily for the first week as the plants get established. Avoid fertilizing for 10-14 days to give them time to adjust to the new environment. After they’ve grown some new roots they’ll be better able to absorb fertilizer.
For more questions about starting transplants indoors, or for questions about a specific crop, please contact your county Extension office.
Also on Gardening Solutions
- Light for Houseplants
- Hydroponic Vegetable Gardening
- Seed Sources
- Starting from Seed
- Vegetable Gardening in Florida Series