
Hydroponic Vegetable Gardening
A hydroponic garden is a fun way to grow your own herbs and vegetables. Hydroponic systems use nutrient-enriched water instead of soil, and have existed for thousands of years. “Hydroponics” is a term derived from the Greek words for “water” and “working.” Ancient Egyptians described growing plants in water, and the Aztecs used floating gardens called “chinampas” to grow vegetables.
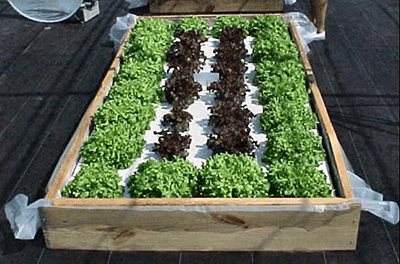
A floating hydroponic garden is easy to build and can provide you with lots of nutritious vegetables. Best of all, this type of gardening avoids weeds and other pest problems common to soil-grown vegetables.
Materials Needed
- Plastic children’s pool or other wide-mouthed bucket
- 1.5 inch thick Styrofoam™
- Water-soluble fertilizer, such as 20-20-20 with micronutrients
- Epsom salts
- Net pots or Styrofoam™ coffee cups with slits cut in the bottom
- Hole saw or sharp knife
Plant Selection
Thought and care are necessary when selecting your plants. It is important to note that transplants used for hydroponic gardens should be started in a typical soilless media, such as peat pellets or a prepared potting mix, available from garden centers.
Leafy salad crops usually do quite well in hydroponic gardens. Great cool season choices include lettuces (romaine, Boston, bibb, and leafy lettuces), mustard greens, mizuna, mint, and kale. Additionally, Swiss chard and the broadly named “Asian Greens” group of Brassica cultivars grow well in most hydroponic production systems. Other cool-season veggies don’t fare as well—spinach is disease prone and collard greens tend to get too large.
Using a floating system does not override the normal challenges of gardening in the warm season in Florida. However, there are some crops that can handle higher temperatures well in a hydroponic system. These are basil, Swiss chard, cucumber, watercress, and some cut flowers like zinnia and sunflowers.
Steps
- Cut the Styrofoam™ to fit the pool and make sure it has sufficient room to move up and down.
- Fill the pool with water to a total depth of at least 5 inches. Keep track of the total gallons of water you add.
- Add water-soluble fertilizer, such as 20-20-20 with micronutrients, at a rate of 2 teaspoons of fertilizer for each gallon of water used in the water garden.
- Add Epsom salt (magnesium sulfate) at a rate of one teaspoon for each gallon of water.
- Use a hole saw or sharp knife to cut holes in the Styrofoam™. A 2.5-inch hole saw is needed to drill the correct-size holes into the Styrofoam™ when using 3-inch net pots. Use 1.75-inch hole saw for 2-inch net pots. Bigger plants like Swiss chard, cucumber, and cut flowers need bigger cups to keep them anchored in the water—otherwise they fall out. The hole size should allow the bottom of a cup to be level with the underside of the Styrofoam™. It’s very important that cups do not extend lower than 1/16 inch below the bottom of the Styrofoam™ sheet. This allows the root mass to wick up water without being totally submerged.
- Place holes 6 inches from the sides and 12 inches apart.
- Place young starter transplants directly into the cups. Use toothpicks, if desired, to hold the transplant in an upright position. Do not remove the potting soil from the transplant. Do not add any potting mix or other material around the young transplant as this will keep the roots too wet and inhibit oxygen intake.
- Add extra water and fertilizer as needed to keep the Styrofoam™ sheet floating on a minimum of 5-inches of solution.
If you are growing hydroponically during hot summer months, it is recommended that you install a 30-50% shade cover.
Light rainfall will have little effect on the water garden; only extensive downpours would require fertilizer adjustment based on the amount of water added by rainfall. The solution in the garden needs to be replaced periodically for optimum production. You can grow two crops of salad greens in the same solution before changing the entire solution and starting with a new batch.
Now, stand back and watch them grow. The care is easy. You won’t even need to water your plants, because they get everything they need from the nutrient solution.
Also on Gardening Solutions
- Growing Vegetables in Containers
- Tabletop Hydroponics Tutorial
- Vegetable Gardening in Florida Series