Sharpening Your Tools

Many landscape and garden tools are used for cutting or chopping, and they also benefit from sharpening. Some obvious examples are axes and pruners, but tools like shovels and hoes also are used to cut and chop. Digging with a sharpened shovel often requires less effort and can reduce the amount of time a job takes.
In fact, keeping tools like pruning shears, shovels, and mowing blades sharp actually means better results for your plants. Clean, sharp cuts allow pruned or cut areas to close more quickly and reduce the chances of rot or infection.
Some useful equipment for sharpening tools includes the following:
- Protective eyewear and gloves
- Steel wool or wire brush
- Files: Flat mill file (8 – 10 inch), Round or half-round file (8 – 10 inch)
- Bench vise, clamp or other bracing system
- Grinding wheel/bench grinder
- Scissor sharpeners
- Sharpening stones
- Sandpaper
- Oils
Sharpening Techniques
When sharpening tools, be patient and remember—the angle matters. Take your time and do the job right. The angle, or bevel, that you put on a tool’s edge determines how sharp the tool is. However, the proper angle is also determined by the intended use of the tool. The proper bevel for a shovel is not the same as that for hand pruners. The smaller the angle, the sharper the edge, but an edge with a smaller angle is not as durable.
For most tools that are sharp when you buy them (pruners, axes, etc.), it is best to follow the factory bevel when you re-sharpen them. It is easy to ruin a pair of pruners by putting an incorrect angle on the edge. Tools that are dull or blunt when they are purchased (shovels, hoes, etc.) benefit greatly from sharpening. Selecting the proper angle for these tools depends on how you intend to use the tool. Most shovels require about a 45° angle; any sharper and the edge will dull too quickly. The proper angle for hoes depends upon the intended use, but generally ranges between 20° and 45°. For heavy chopping and cultivation, 45° is best. A good general purpose edge for most hoes is 30° to 35° while fine weeding may require a bevel between 20° and 30°.
Sharpening Shovels and Hoes
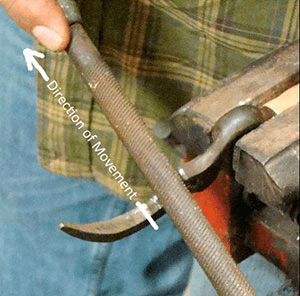
Start by removing any surface rust or dirt on the tool using steel wool or a wire brush. Clamp it right side up in a vise, and drag a metal file along one edge in a smooth, even motion. Work in one direction and try to maintain a consistent angle. Then repeat on the other side.
You should be able to see a line of clean steel as you work. Keep doing this until you have a clean steel edge across the entire blade, with the desired bevel.
Your goal is to hone the edge without removing too much metal. You can use a bench grinder or rotary tool instead of a file. Just be sure to wear the proper protective equipment.
Use 300-grit sandpaper to remove any burrs on the back side of the blade. Finally, apply a light coating of a good-quality oil to protect the blade from rusting.

Sharpening Hand Pruners
Sharpening hand pruners is very similar to sharpening shovels and hoes.
Loosen the pivot bolt and separate the blades. Don’t forget to clean off any rust or dirtf. Place cutting blade in the bench vise or clamp. Make sure the blade is positioned so that you can put the proper bevel on the cutting edge, and follow the steps above.
Find the appropriate angle for the bevel. Remember, it is best to follow the factory bevel that was on the blade initially.
Now, place the blunt blade in the bench vise. Make sure the blade is positioned so you can work on the inside of the curve. Using a round or half-round smooth file, file the edge of the curve perfectly flat. It is critical that you file this edge at 90° to the inside of the blade. Again, move the file in only one direction and avoid short, jerky strokes.
Use 300-grit sandpaper and oil afterwards.
A properly sharpened tool can make a job much easier. Sharp tools help save time and effort. If you are patient and have the right equipment, putting a sharp edge on your landscape and garden tools is not difficult. However, if you are not comfortable sharpening these tools yourself, professional sharpening services are available to put a keen edge on your tools.
Source
G. Denny, Sharpening Tools for Landscaping and Gardening (ENH1120), Environmental Horticulture Department (05/2009).
