
DIY Simple Microirrigation
Save water and money
Because Florida experiences rainy and dry seasons, our irrigation needs change throughout the year. For home gardeners with Florida-Friendly landscapes, foodscapes, small raised beds, or newly planted trees, a microirrigation system can save a lot of trips with the watering can.
Microirrigation is an inexpensive way to irrigate without installing an in-ground system. Drip emitters, bubblers, drip tubing, and microsprays are some of the most common microirrigation options. Materials for these systems are generally less expensive than in-ground system hardware. Basic installations are easy enough to tackle as a weekend DIY project, too.
In this tutorial, we’ll show you how to set up a simple drip tube or soaker hose system. You can learn more about other microirrigation options in the UF/IFAS publication “Microirrigation for Home Landscapes.”
Step 1: Make a plan
First, draw a quick plan for your microirrigation system. Doing this before you purchase and install will help you avoid wasting time and money along the way. If you can, draw your plan to scale (ex. 1 foot in the garden – ½ inch on paper). This will help you estimate materials to purchase later.
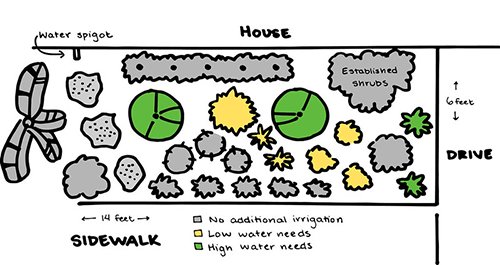
Begin by measuring the area you’d like to irrigate. Include the water source (spigot, rain barrel, etc.) in the drawing.
Next, mark the location of existing plants and ones you’d like to add. If you’re unfamiliar with a plant, do a little research to determine its irrigation needs. For example, established native shrubs likely don’t require extra irrigation. Vegetables, on the other hand, may need almost daily watering to ensure a good harvest. Any plants you add will need at least temporary irrigation while they are being established.
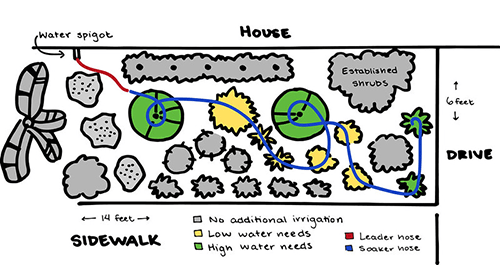
Once you know which plants will need additional water, you’re ready to plan for irrigation. Add a line representing your drip tube or soaker hose to the drawing. Also add a short length of hose (a leader hose) to connect the irrigation system to your water source.
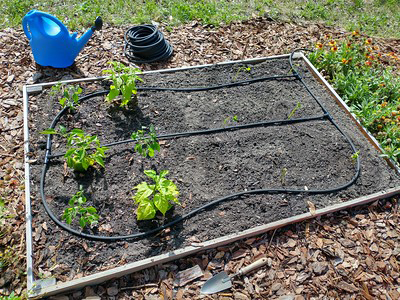
Because of their regular shapes and straight rows of plants, raised beds are generally simple to irrigate. Plan to run the hoses along the rows of plants, close to the base. Some areas, like garden beds and foodscapes, have only a few plants that need irrigation. In areas like this, snake the hose between plants. You’ll save materials and water by finding the shortest path.
Finally, newly installed trees and shrubs can use extra irrigation until they’re established. A loop of soaker hose or a bubbler can help you water the new plant temporarily. Once the tree or shrub is established, you can remove the microirrigation and water only as needed.
Step 2: Measure and choose materials
If you drew your plan to scale you can use it to estimate how much hose or drip tube you’ll need. If you did not draw your plan to scale, you can still estimate easily. Lay out an existing hose or a length of rope in your planting where you would install irrigation materials. Make a mark on this prop where you’d like your drip tubing to begin and end. Measure the distance between the marks and you’ll have the length of material to purchase.
Some experts only recommend soaker hoses for temporary installations. Soaker hoses tend to clog and deteriorate faster than drip tubing. This makes soaker hoses less reliable in the long term. And when a hose does fail, it can waste a lot of water before it is replaced or repaired.
Still, soaker hoses are less expensive than drip tubing and require less expertise to install. If you’re new to raised beds or only watering temporarily, soaker hoses might be a good choice. See the table below for a comparison of drip tubing and soaker hoses.
Drip tubing
- Water “drips” out small, evenly spaced holes along the length of the hose.
- A good choice for evenly spaced plants and long-term irrigation.
- Generally durable and long-lasting.
- Sometimes more expensive.
- May be installed below the soil or mulch level.
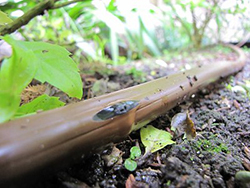
Soaker hoses
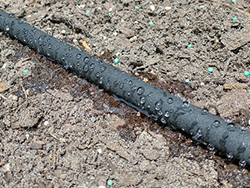
- Water “soaks” through porous hose along entire length.
- A good choice for irregularly spaces plants and temporary irrigation.
- Less durable and long-lasting.
- Usually less expensive.
- Must be installed above the soil level. Can be installed under mulch.
Here are more materials you may need:
Leader hose – A short, non-perforated hose. Leader hoses connect the microirrigation system to a water source.
A garden faucet splitter – A splitter attaches to the water source faucet and splits into two separate faucets. Attaching your irrigation hose to one faucet and the regular hose to the other. This way you can easily switch between them.
An irrigation timer – Timers turn off the water if you forget. Simple, manual dials are widely available and inexpensive. Digital systems that can be controlled by a smart phone app are also an option.
Teflon tape – This tape seals leaky hose connections. It is wrapped on the threaded end of the hose before connecting it to a faucet or second hose.
Mulch – A 3-inch layer of mulch helps the soil retain the moisture supplied by drip tubing.
Step 3: Installation and maintenance
The old adage “measure twice, cut once” could have been written about soaker hoses and drip tubing. When it’s time to install your microirrigation system, lay the hoses or tubing out in the bed as you planned. Check the placement before you cut them.
Once you’re sure your measurements are correct, cut the materials to length. Attach tubing, hoses, connectors, and splitters as per manufacturer directions.
When you’re happy with the hose arrangement, turn the system on and check for large leaks. If the leak is at a connection point between hoses, tighten the connection. If the leak is along the length of a tube or hose, repair or replace it as the manufacturer suggests.
If no leaks appear and you’re happy with your placement, cover the tubing or hoses with mulch. This will hide them from view and keep the water from evaporating. The mulch certainly isn’t necessary though. If your irrigation needs are only temporary you can lay the system right on top.
For more on landscape irrigation contact your county Extension office.
Also on Gardening Solutions
- All Irrigation articles
- Irrigation Pitfalls
- Microirrigation
- Watering the Vegetable Garden
- Watering to Establish Shrubs